Configuring KuberLogic
Using docker-compose to provide your application
KuberLogic provides a simple way to deploy your application as SaaS by supporting docker-compose.yaml structure.
WARNING
KuberLogic only supports a single application type configured via docker-compose.yaml. Any change to this file will be propagated to all KuberLogic managed applications.
You will be asked to enter path to the docker-compose.yml during the installation process, otherwise KuberLogic will be provisioned with demo application.
Limitations
There are few limitations about supported docker-compose.yaml:
Only one service can have its ports published
Will work:
version: "3"
services:
  - name: my-service
    image: my-image
    command:
      - "./run.sh"
- name: my-service-2
  image: my-image
  ports:
    - "8080:8080"
  command:
    - "./run.sh"
Will not work:
version: "3"
services:
  - name: my-service
    image: my-image
    ports:
      - "8080:8080"
    command:
      - "./run.sh"
- name: my-service-2
  image: my-image
  ports:
    - "8080:8080"
  command:
    - "./run.sh"
Only a single port can be published.
Will work:
version: "3"
services:
  - name: my-service
    image: my-image
    command:
      - "./run.sh"
- name: my-service-2
  image: my-image
  ports:
    - "8080:8080"
  command:
    - "./run.sh"
Will not work:
version: "3"
services:
  - name: my-service
    image: my-image
    command:
      - "./run.sh"
- name: my-service-2
  image: my-image
  ports:
    - "8080:8080"
    - "8081:8081"
  command:
    - "./run.sh"
Local volume mounts are not supported
Will work:
version: "3"
volumes:
  data:

services:
  - name: my-service
    image: my-image
    command:
      - "./run.sh"
    volumes:
      - data:/data
Will not work:
version: "3"
services:
  - name: my-service
    image: my-image
    command:
      - "./run.sh"
    volumes:
      - ./data:/data
Supported docker-compose extensions
You can use the following extensions to your docker-compose.yaml:
x-kuberlogic-access-http-path
This extension allows you to expose more than one docker-compose service by specifying HTTP path prefixes. Default path prefix is /.
Duplicates are not allowed and will trigger a service provisioning error.
Will work:
version: "3"
services:
  - name: api # This will be exposed at `/api`
    x-kuberlogic-access-http-path: /api
    image: my-image
    command:
      - "./run.sh"
    ports:
      - "8080:8080"
  - name: web # This will be exposed on `/`
    image: web
    ports:
      - "8080:8080"
Will not work:
version: "3"
services:
  - name: api # This will be exposed at `/api`
    x-kuberlogic-access-http-path: /api
    image: my-image
    command:
      - "./run.sh"
    ports:
      - "8080:8080"
  - name: web # Duplicate HTTP path prefix!
    x-kuberlogic-access-http-path: /api
    image: web
    ports:
      - "8080:8080"
Templating docker-compose.yaml
KuberLogic also supports templating certain service fields in docker-compose.yaml by using Go templates.
Fields that can be templated are:
imagecommandenvironmentvariables' values
Service parameters that can be accessed in the template are:
Name: The name of the serviceNamespace: The namespace of the serviceHost: The host of the serviceReplicas: The number of replicas of the serviceVolumeSize: The size of the volume of the serviceVersion: The version of the serviceTLSEnabled: Whether the service is TLS enabledParameters: The advanced parameters of the service
There are also a few functions that can be used for environment variables:
.Endpoint: Returns the endpoint of the service.GenerateKey <len: int,optional>: Generate a random key of the specified length.GenerateRSAKey <bits: int,optional>: Generate a random RSA key of the specified lengthPersistentSecret <id: string,optional>: Saves the value of the field in a persistent secret that will be used by the service. (Note the absence of . at the start of the function).
WARNING
Generate... functions will generate different values each time the template is rendered. This will result in constant service restarts.
You should use PersistentSecret function to store the generated value of the field in a persistent secret.
Examples
Specify the image version
Provisioned services will use version as the image tag or "latest" if not specified.
version: "3"
services:
  - name: my-service
    image: my-image:{{ default .Version "latest" }}
    command:
      - "./run.sh"
    ports:
      - "8080:8080"
Configure service URL parameter
version: "3"
services:
  - name: my-service
    image: my-image
    command:
      - "./run.sh"
    ports:
      - "8080:8080"
    environment:
      - BASE_URL={{ .Endpoint }}
Generate a random key and save it to the persistent secret
version: "3"
services:
  - name: my-service
    image: my-image
    command:
      - "./run.sh"
    ports:
      - "8080:8080"
    environment:
      - SECRET_KEY={{ .GenerateKey 30 | PersistentSecret }}
Generate a random RSA key and access it for the different service
RSA key will be generated and saved in a persistent secret under the "PRIVATE_RSA_KEY" key.
version: "3"
services:
  - name: my-service
    image: my-image
    command:
      - "./run.sh"
    ports:
      - "8080:8080"
    environment:
      - SECRET_KEY={{ .GenerateRSAKey 2048 | PersistentSecret "PRIVATE_RSA_KEY" }}
  - name: my-service-2
    image: my-image
    command:
      - "./run.sh"
    ports:
      - "8080:8080"
    environment:
      - SECRET_KEY={{ .GenerateRSAKey 2048 | PersistentSecret "PRIVATE_RSA_KEY" }}
Setting Ingress controller
KuberLogic requires Ingress controller to be expose services to the public internet.
To install Ingress controller, follow Kong installation guide:
https://github.com/Kong/kubernetes-ingress-controller
Or just run to apply kong ingress controller:
kubectl apply -f https://bit.ly/k4k8s
Check if you have a default ingressClass installed:
kubectl get ingressclasses -o go-template='{{ range .items }}{{ if eq ( index .metadata.annotations "ingressclass.kubernetes.io/is-default-class" ) "true" }}{{ println .metadata.name }}{{ end }}{{ end }}' | xargs echo "Default ingressClass:"```
If your output is Default ingressClass: <ingressClass>, then you have a default ingressClass installed.
TIP
You can only have a single default ingressClass.
If you don't have a default ingressClass installed, you need to set up one:
kubectl get ingressclasses
kubectl annotate ingressclass kong ingressclass.kubernetes.io/is-default-class=true
You should change “kong” to your ingressClass name if you use another Ingress controller. You can only have one default ingressClass, so make sure no other ingressClasses marked as default.
Configuring TLS certificate
It is assumed that the TLS certificate will be a wildcard certificate. All KuberLogic managed applications share the same certificate by sharing the same ingress controller.
Kuberlogic allows you to secure application access with TLS certificate. KuberLogic uses a sample TLS certificate by default.
Enabling backup/restore capability
WARNING
Backups will only work if you use CSI based volumes. Backups will not work for hostPath volumes.
Backups and restores feature is provided via Velero integration. Both file-based and volume snapshot based backups are supported. Backups and restores are disabled by default. Follow these steps to configure environment and enable backup feature:
Get supported Velero release (follow the steps from the official Velero website)
Install Velero for your infrastructure provider. Make sure to include
--use-resticto enable file based backups.Verify Velero status.
velero version
# Example output
#
# Client:
# Version: v1.9.0
# Git commit: -
# Server:
# Version: v1.9.0
velero get backup-locations
# Example output
# NAME PROVIDER BUCKET/PREFIX PHASE LAST VALIDATED ACCESS MODE DEFAULT
# default aws kl-demo-backups Available 2022-07-11 13:54:24 +0300 EEST ReadWrite true
## Billing integration
KuberLogic uses webhooks to integrate with various billing providers. Below you can find a scheme of core moving parts of a billing provider integration and instructions on how to set up ChargeBee to work with KuberLogic.
Billing providers such as ChargeBee have ready-made components that you can easily integrate into your own site (create a pricing table, add products, set up a customer portal).
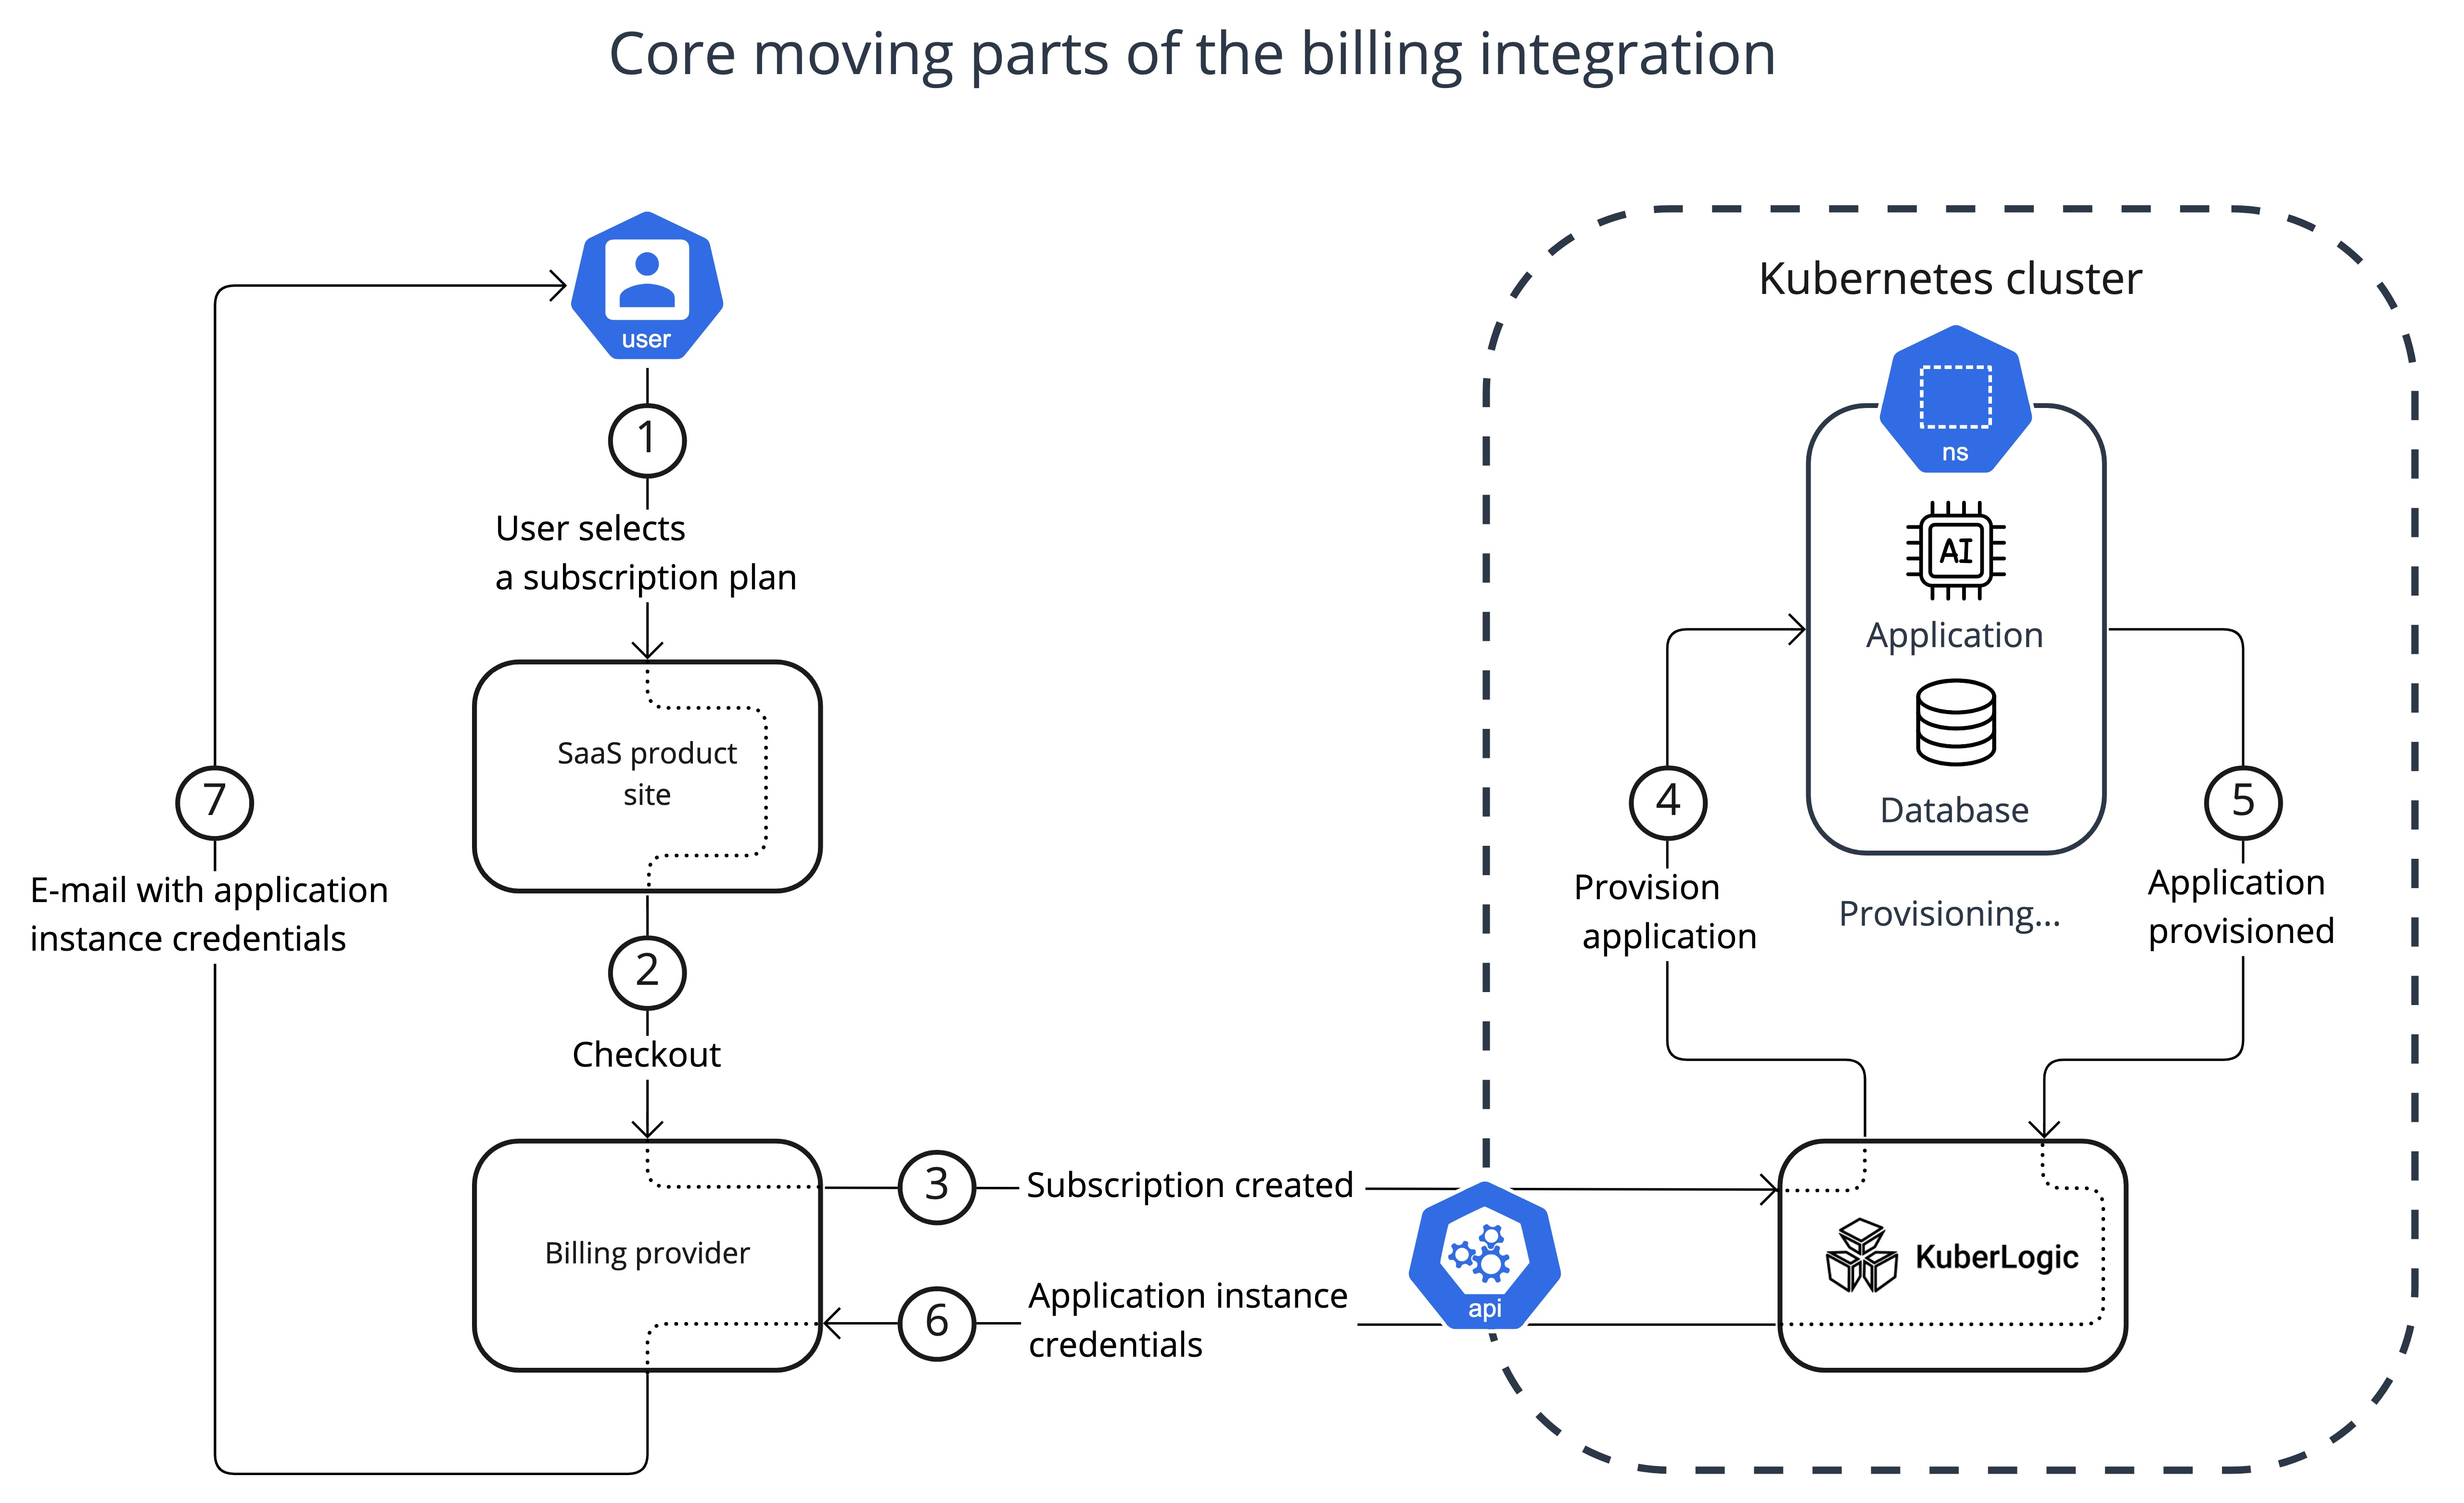
- Step 1. Software vendors post a pricing table on a product site ([Products and checkout](https://www.chargebee.com/checkout-portal-docs/drop-in-integration.html#integrating-checkout)). Users can choose a product from the pricing table and proceed to checkout. Also you need to add [custom field](https://www.chargebee.com/docs/2.0/custom_fields.html) "domain" (as in example below) that will be updated by KuberLogic once application instance is ready.

- Step 2. The billing provider charges the user in accordance with the chosen subscription plan.
- Step 3. The billing provider sends an event via Webhook to KuberLogic. 1. [API keys](https://www.chargebee.com/docs/2.0/api_keys.html) 2. [Webhook](https://www.chargebee.com/docs/2.0/events_and_webhooks.html)
- Step 4. KuberLogic generates a domain name for the application instance, provisions an application instance in accordance with the chosen subscription plan, and ensures application availability.
- Step 5-6. After the application instance is provisioned KuberLogic sends an event to the Billing provider with the application instance domain name information. This event updates the user's subscription with the domain.
- Step 7. On the "subscription update," event Billing provider sends an e-mail "Your subscription has been updated" to the User with the application domain name added to the e-mail custom field. You can customize the e-mail template to something like "Your application instance is provisioned!" and add to the template previously created custom field. [Email Notifications](https://www.chargebee.com/docs/2.0/email-notifications-v2.html)
- Additional. You should add a link to the Customers portal to your application to allow users to manage the subscription [Single Page Customer Portal](https://www.chargebee.com/docs/1.0/customer_portal.html)
### Configuring KuberLogic
You will be asked to configure Chargebee integration during the installation process. Leaving `Chargebee site` parameter empty will disable Chargebee integration.
* "KuberLogic domain" configuration parameter is used by KuberLogic to generate subdomains for the application instances (e.g. http://magnetic-llama.example.com, http://pleasant-antelope.example.com)
Example:
```shell
- chargebee_site=example-test
- chargebee_key=test_aTwdMcu4LDMU3eCadmXCJYcubL60tGDYbGeUg
- kuberlogic_domain=example.com
Webhook configuration example:
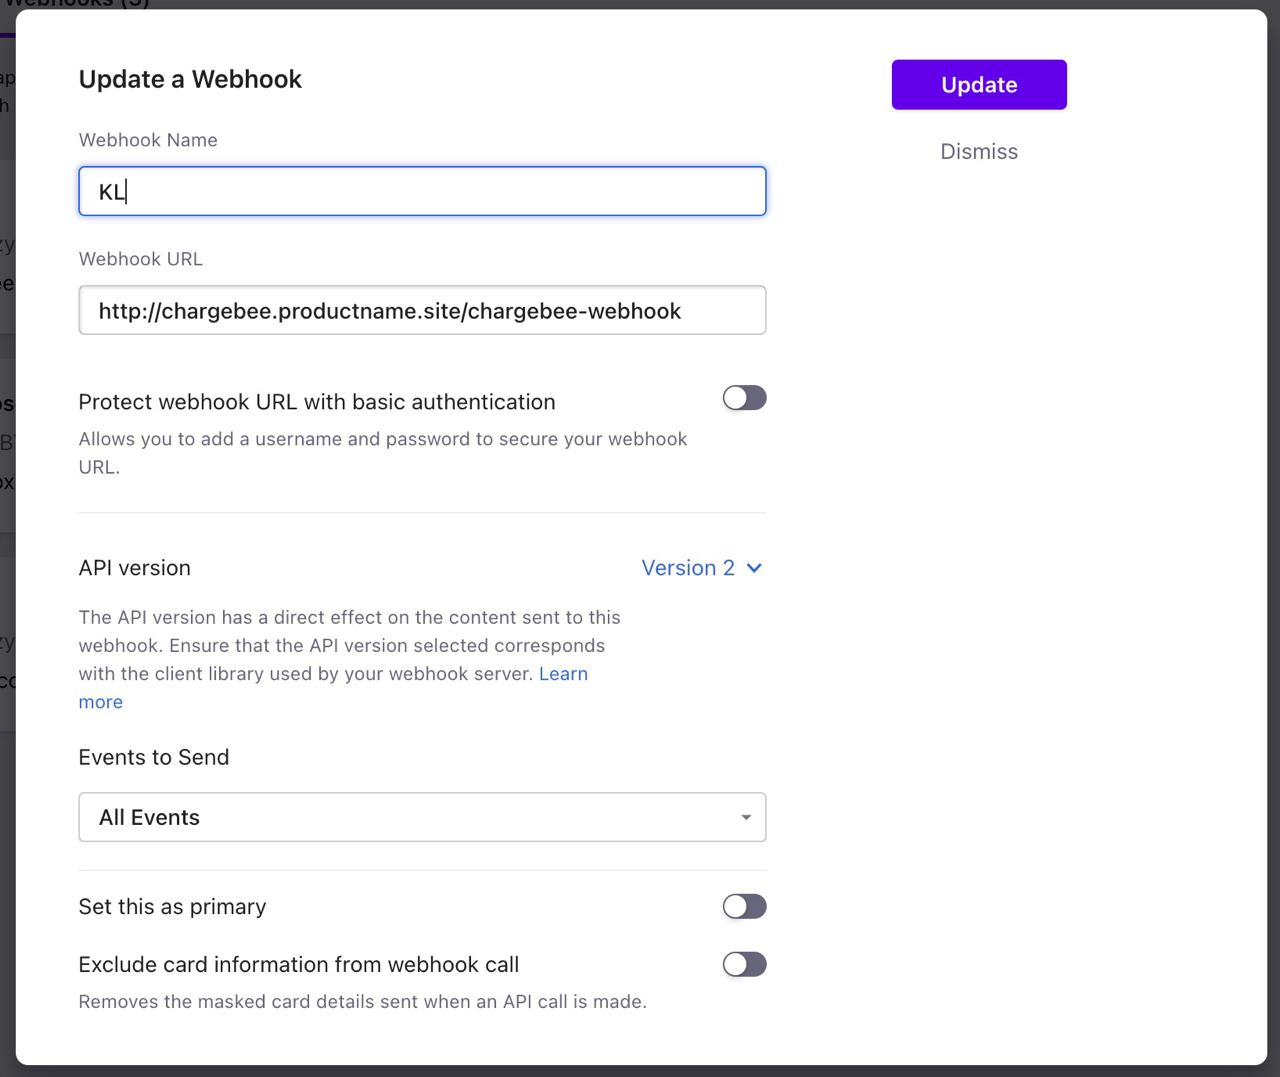
Webhook URL should lead to "kls-chargebee-integration" service External IP.
Type to see the IP:
>kubectl get svc -n kuberlogic
# Example output
#NAME                                     TYPE           CLUSTER-IP   EXTERNAL-IP      PORT(S)        AGE
#kls-api-server                           LoadBalancer   10.8.10.73   34.121.153.159   80:31098/TCP   5h19m
#kls-chargebee-integration                LoadBalancer   10.8.10.7    34.135.30.100    80:32415/TCP   5h19m
#kls-controller-manager-metrics-service   ClusterIP      10.8.4.214   <none>           8443/TCP       5h19m
#kls-webhook-service                      ClusterIP      10.8.15.55   <none>           443/TCP        5h19m
